
20Questions and Answers for Level 1
About Level 1 Books
- The Level 1 Lesson Book starts with a Primer Review, “Get Ready for Take-off!” Is this important to do?
- Should I use all four core Level 1 Books: Lesson, Theory, Technique & Artistry, and Performance?
- How do I fit all four core books into a lesson?
- Why are the treble clef line notes taught with “E-G-B Mouse” instead of “Every Good Boy Does Fine?” (Lesson Bk. p. 6)
- What are Bass clef “Smart Notes” and why are they used?
- What is transposition and what is its role in Level 1?
- Why did the Primer refer to steps and skips, and in Level 1 change to 2nds and 3rds?
- Why are tonic and dominant taught and why is this important?
- Why is a 2-note V7 chord introduced? (Lesson Bk. p. 53)
- The Lesson Book has a Challenge Section that presents 5-finger scales and chords in D, E, F, G, and A? What are tips to use this? (pp. 62-63)
- What are the Technique Secrets and how do they help?
- When should I begin the Level 1 Sightreading Book and how?
About Level 1 Students
- How many songs should a student be assigned each week?
- How is the damper pedal introduced to the student?
- What if a student has a poor sense of rhythm?
- What pieces could a student play for extra fun?
- How important are recitals?
- Can I teach Level 1 students in an online lesson? What are some teaching tips?
About Level 1 Adventures Learning Videos
About Level 1 Audio Files
1. The Level 1 Lesson Book starts with a Primer Review, “Get Ready for Take-off!” Is this important to do?
The Primer Review that begins Level 1 is a handy teacher assessment tool. Use it for students graduating to Level 1 as well as transfer students. The Primer Review helps the teacher assess what is understood and what needs more support.
The two pages cover rhythm, time signatures, dynamic marks, note names, steps, skips, the C 5-finger scale, and a preview of the G 5-finger scale to begin transposing.
Areas in which the student lacks confidence allow the teacher to “review and renew” understanding. Explore board work, flashcards, and cheerful questions and answers to review concepts together. Consider using the Primer Sightreading Book for students who need their reading skills strengthened as they begin Level 1.
Level 1 Lesson Book
Get Ready for Take-off! (Primer Review, pp. 4-5)

2. Should I use all four core Level 1 Books: Lesson, Theory, Technique & Artistry, and Performance?
The four core Level 1 Books form a set for wholistic learning and correlate by page number. The Theory, Technique & Artistry, and Performance Books give fresh perspectives for concepts in the Lesson Book. It is possible a teacher could substitute a different solo book than the Performance Book. However, the precise tie-in of concepts in the core books is hard to beat. The elementary student is forming connections—connections that begin to form the “musical mind”—and the more efficient these connections are made the better.
The core books address things easy to miss in lessons: ear-training, sightreading, improvisation, and importantly, technique from the very first lessons. Taking the time for deeper learning using the four core Level 1 Books prepares students for success in Level 2A.
3. How do I fit all four core books into a lesson?
The three most important books are the Lesson Book, the Theory Book, and the Technique & Artistry Book. A 30-minute lesson allows about 10 minutes per book. A 45-minute lesson offers a distinct time advantage for using all four books.
If time is short, consider demonstrating the Performance Book piece while the student watches the music. Give a few pointers, then assign to learn at home as your own “adventure piece.” This gives the teacher an opportunity to see what is easy and what is challenging at the next lesson.
For the Theory Book, the teacher might do the first example on a page with the student, then assign to complete at home. Parents can often help at Level 1.
With careful lesson planning and efficient use of lesson time, the four books can be implemented, even if one book is not covered in some lessons.
4. Why are the treble clef line notes taught with “E-G-B Mouse” instead of “Every Good Boy Does Fine?” (Lesson Bk. p. 6)
To “read with ease” is the goal for the elementary piano student. We teach the student note names and intervals for a quick reading response—visually on the page and physically on the keys.
In Level 1, learning the treble lines as a set gives the student a broader “playing board” to navigate notes. A playful mouse whose first name is “E-G-B” and last name is “D-F” instructs with Mouse Mission 1, 2, 3, and 4.
Students do the following steps:
- Mission #1: To repeat the mouse’s name quickly after the teacher.
This preps the student to go directly to the letter name.
Repeat 3 times: “E-G-B-D-F! E-G-B-D-F! E-G-B-D-F!”
This strategy avoids the need to process a sentence such as, “Every Good Boy Does Fine”—requiring the student to extract the first letter from each word in order to name the note.
- Mission #2: To play the mouse’s name “E-G-B-D-F” up the white keys.
Students immediately see the skips on the keyboard and become at ease moving by interval.
- Mission #3: To find treble line notes as requested.
The teacher then calls out “line 1” or “line 3, etc. The student finds and names the key on the piano thinking in “skips.” Do at many lessons.
- Mission #4: To shade the letter names in the notes for a “solo flight.”
Shade the notes on the page so the letter names disappear! The teacher points to a shaded note. The student plays and names it on the piano using the mouse’s name “E-G-B-D-F” as the guide. Do at many lessons.
Summary: If teachers do this as a “one-minute note warm-up” at the start of lessons for most of Level 1, they will find their students very adept at reading treble line notes! (Best to handle this skill at Level 1 and not wait until Level 2A to do remedial note reading drills.)
Level 1 Lesson Book
Head Start for Treble Clef Lines (p. 6)

5. What are Bass clef “Smart Notes” and why are they used?
“Read with ease” applies to reading bass notes as well. In Level 1, three “Smart Notes” are used to provide anchors for the bass staff. A student’s quick, accurate response to each helps locate other bass notes quickly.
The “Smart Notes” are strategically chosen:
Top Line A: Think “First letter in the musical alphabet.”
Bottom Line G: Think “Last letter in the musical alphabet.”
Middle Line D: Think “Hey, diddle, diddle, D’s in the middle.”
- Mission #5: To find bass “Smart Notes” as requested.
The teacher points to a Smart Note with the letter name inside. How fast can the student play it on the piano? Students enjoy the game of jumping to the three Smart Notes — top line A, middle line D, and bottom line G.
- Mission #6: To shade in the letter names for a “solo flight.”
Shade the Smart Notes so the letter names disappear. Repeat Mission #5, but this time take a solo flight — no visible letter names.
- Final Mission: To practice finding any bass note.
A set of 8 sample notes on the bass staff are given. The student names the closest Smart Note, then finds and names the new note.
These activities become note-reading strategies.
Level 1 Lesson Book
Head Start for Bass Clef Lines (p. 7)

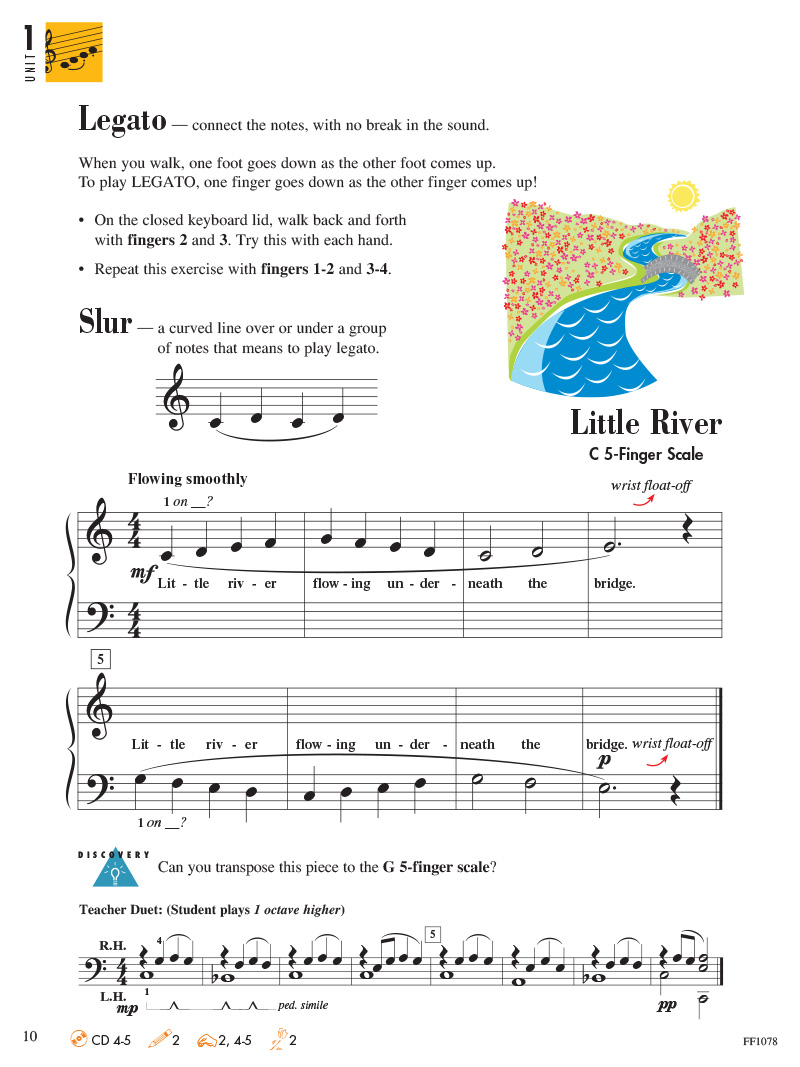
6. What is transposition and what is its role in Level 1?
The word “transpose” means to “put across or over.” For the Level 1 student, this means placing the hands across the keys, usually to another 5-finger scale.
The role of transposition in Level 1 yields important results.
- It highlights theory as students apply new scales to familiar pieces.
- It develops technique through patterns recognition in other keys.
- It strengthens reading by interval.
Level 1 Lesson Book
Firefly (pp. 8-9)

Little River (p. 10)
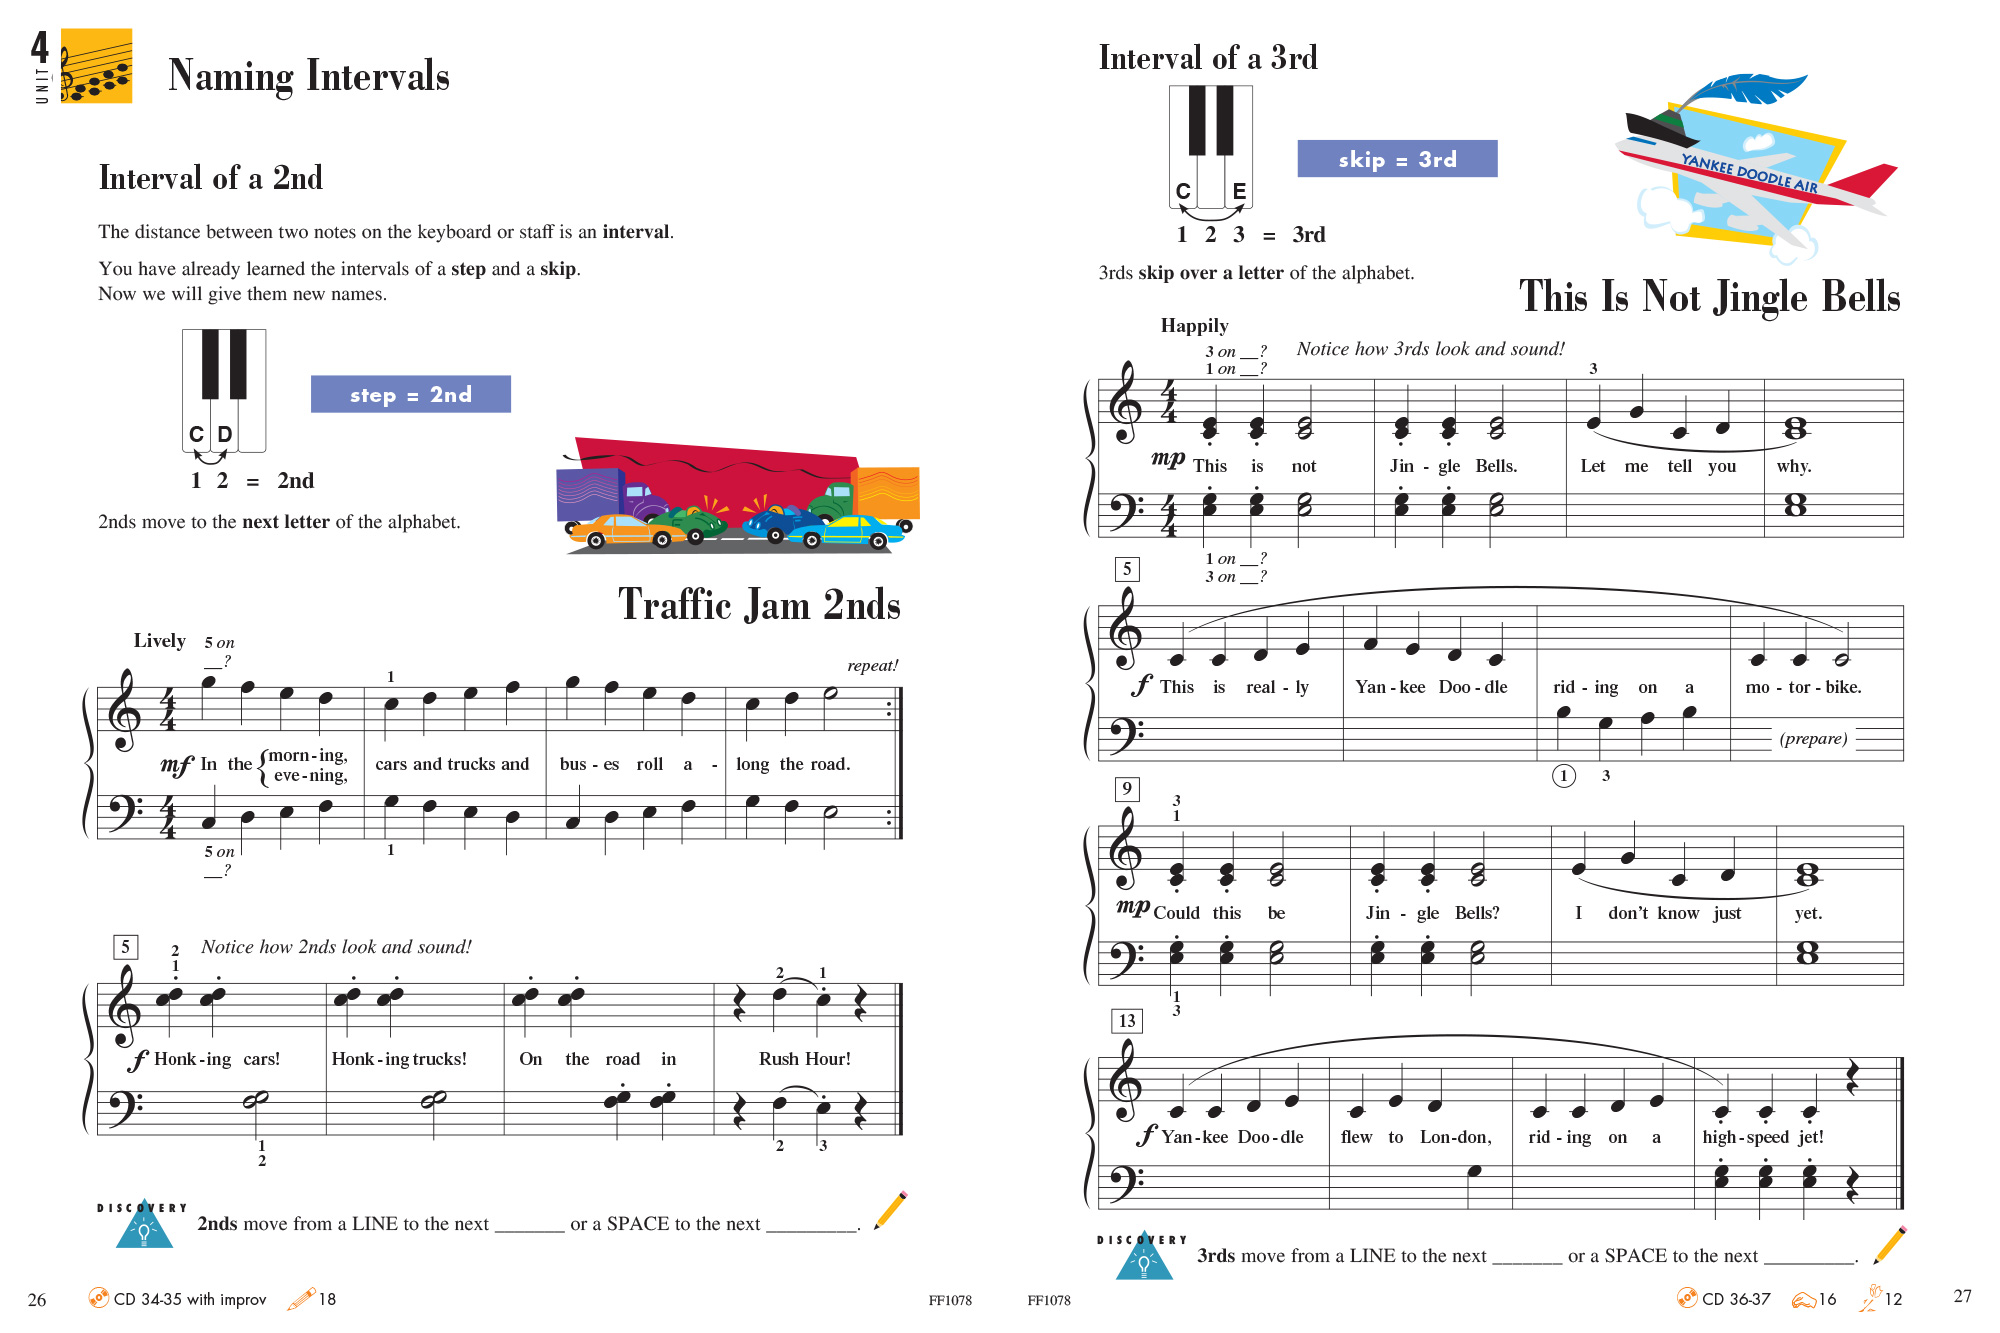
7. Why did the Primer refer to steps and skips, and in Level 1 change to 2nds and 3rds?
The words “step” and “skip” are quite helpful in the Primer since the words themselves describe the action. We step to the next key and we skip over a key. It also eliminates confusion with finger numbers for the beginner.
At Level 1, we are preparing the student to learn, read, and compose/improvise with intervals up through the 5th. It is here we introduce a new, more advanced way to name steps and skips— 2nds and 3rds. This prepares the student for upcoming 4ths and 5ths and, eventually, in later levels the 6th, 7th, and octave.
Level 1 Lesson Book
Naming Intervals (pp. 26-27)
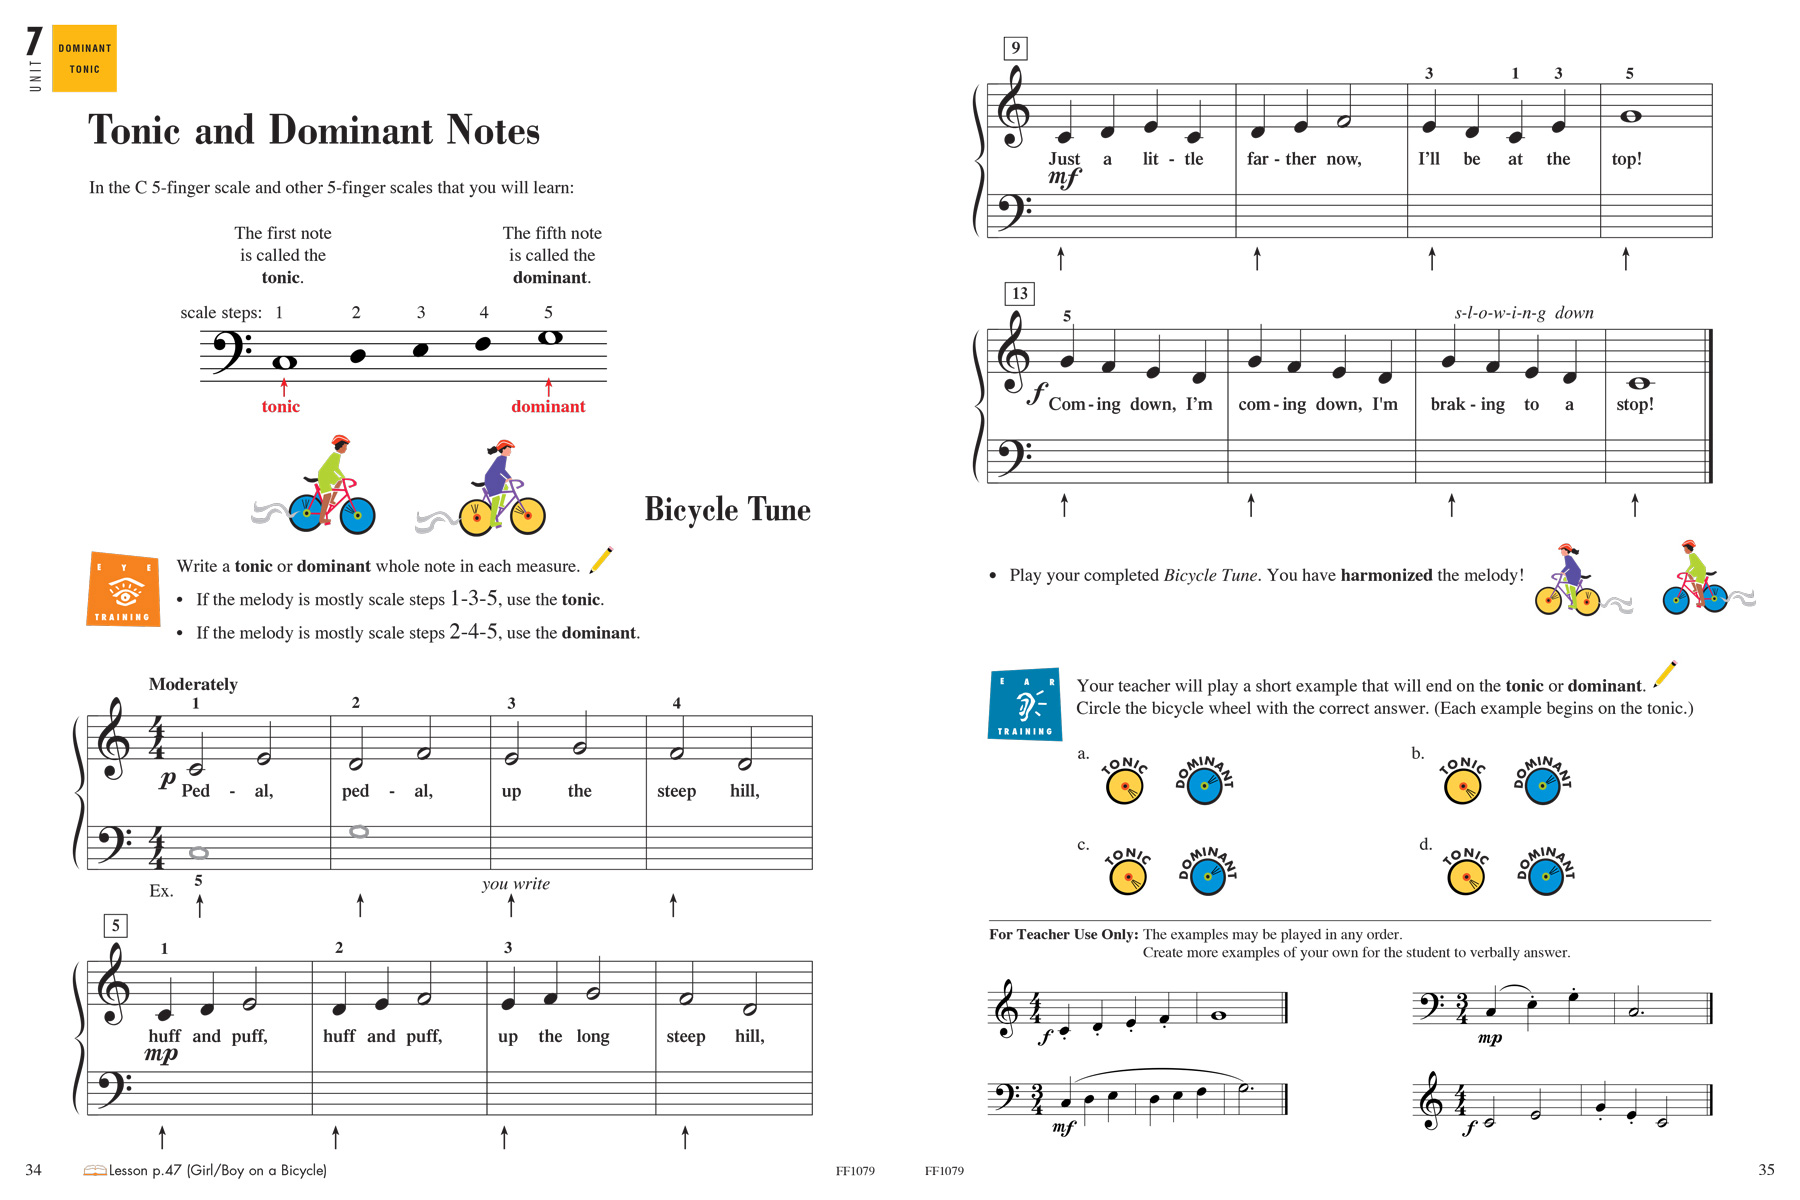
8. Why are tonic and dominant taught and why is this important?
The two most powerful notes of the scale—tonic and dominant—can be easily taught to Level 1 students. Teachers need only use these words in lessons on a regular basis to have students “think theory” rather than just notes.
- Playing from tonic to dominant (the interval of a 5th) technically helps the Level 1 student build the outside of the hand.
Level 1 Lesson Book
Tonic and Dominant (p. 46)
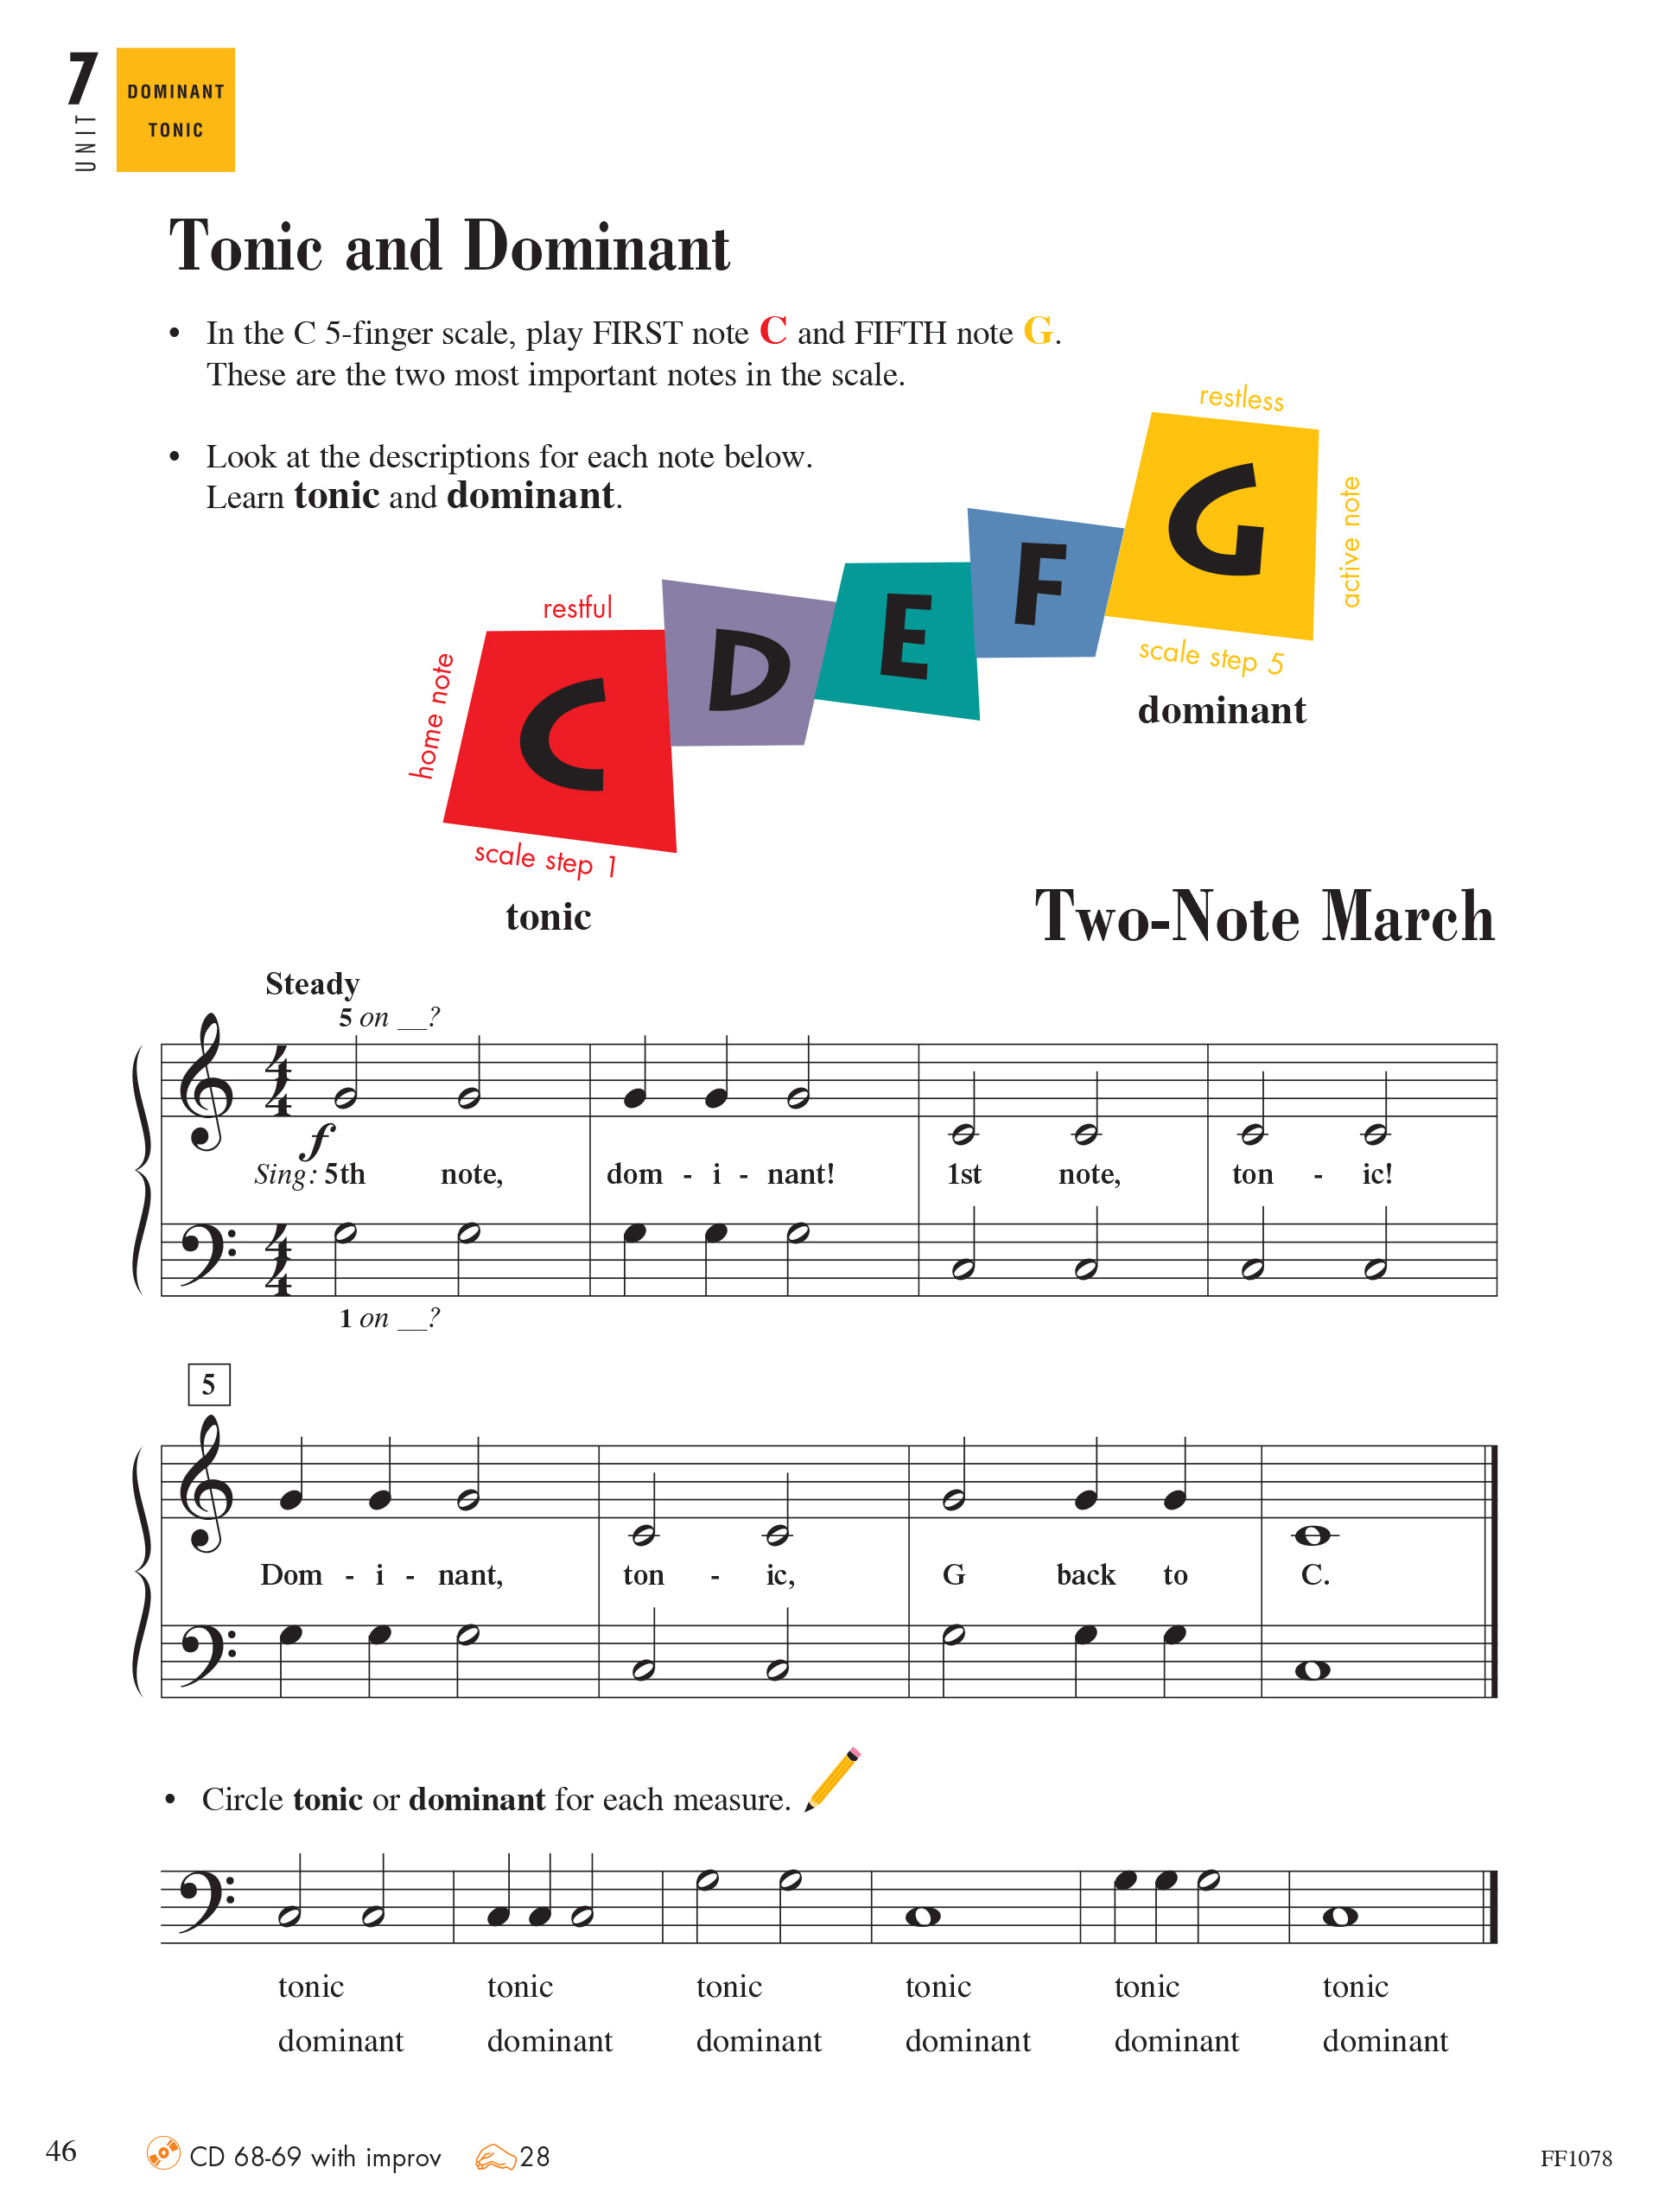
Level 1 Technique & Artistry
Gymnastics (p. 28)

Journey by Camel (p. 29)

- Harmonizing with tonic and dominant notes builds theory and ear-training skills.
Level 1 Theory Book
Bicycle Tune (pp. 34-35)
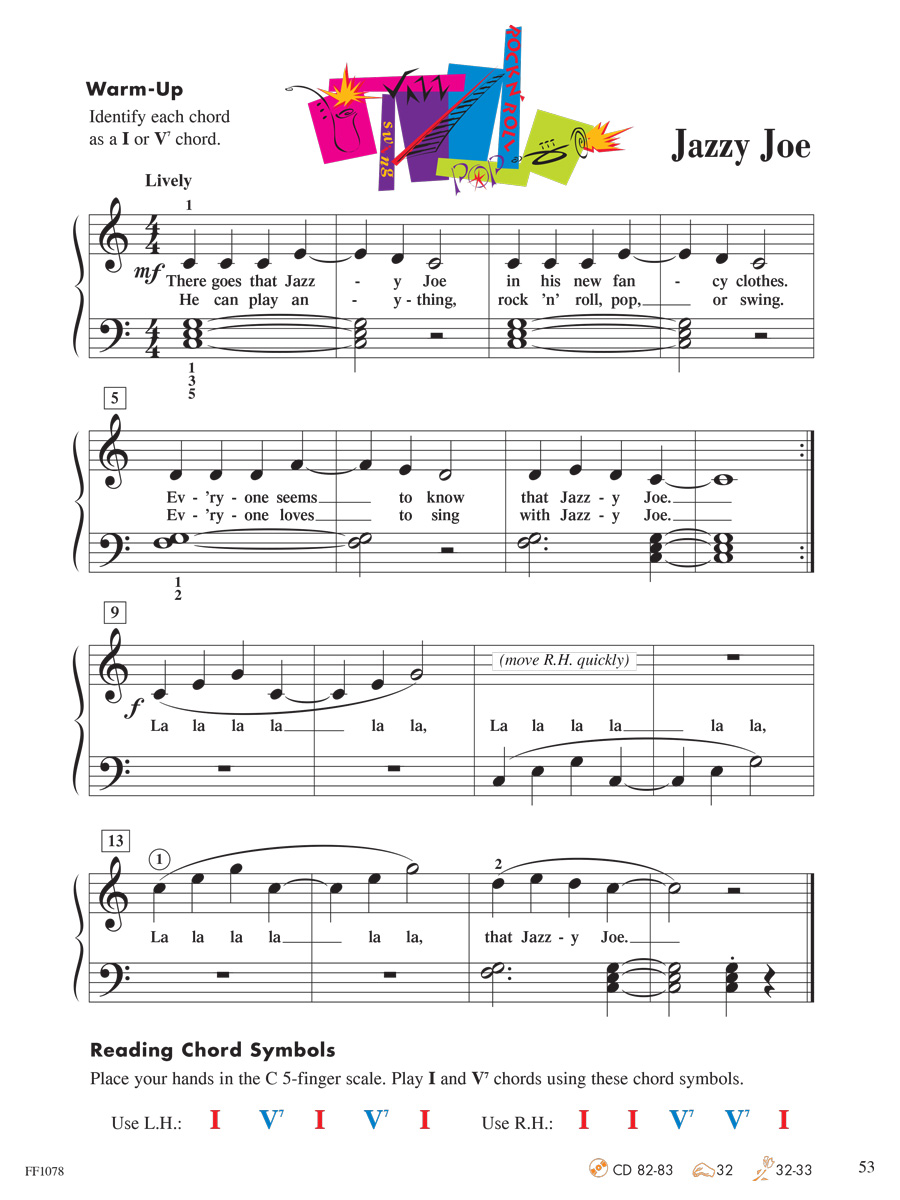
9. Why is a 2-note V7 chord introduced? (Lesson Bk. p. 53)
The 2-note V7 chord is used (instead of a 3-note V7) for three reasons:
- The interval of a 6th formed between the lowest and highest note of the 3-note V7 chord sometimes creates tension for a smaller hand.
- The technical challenge of the 3-note V7 chord often produces rhythmic faltering.
- The 2-note V7 chord makes for an easier technical change between I and V7 chords, and also creates a more pleasing balance between melody and harmony for beginning players.
Level 1 Lesson Book
Jazzy Joe (p. 53)
Level 1 Technique & Artistry Book
Four Technique Secrets (pp. 2-3)

10. The Lesson Book has a Challenge Section that presents 5-finger scales and chords in D, E, F, G, and A? What are tips to use this? (pp. 62-63)
The first line of each “Adventure Warm-up” is a 5-finger scale that ends with a broken chord. The 5-finger scales of C, G, D, A, and E are presented with colorful illustrations that use cookies to illustrate white and black key patterns.
Students can begin learning these 5-finger scales and broken chords (the first line of each Warm-up) at any point in Level 1. Some teachers enjoy presenting a multi-key approach with transposition early, while others prefer to wait.
The second line of each Warm-up presents a I and V7 chord pattern. This may be best taught after page 52 when the theory of I and V7 chords has been presented in C. The full Warm-up can then be transposed easily to other keys.
Level 1 Lesson Book
Challenge Section (pp. 62-63)

11. What are the Technique Secrets and how do they help?
Technique at the piano requires more than finger muscles. It involves sophisticated body motion between the body, arm, wrist, and finger. We call these motions “technique gestures.”
At each level of Piano Adventures, the student is introduced to level-appropriate Technique Secrets that promote fluent playing while preventing bad habits. These “secrets” are used as daily warm-ups for the exercises that follow in the book. This combination of secrets and exercises leads to an Artistry Magic Piece at the end of each unit. These pieces allow the elementary student to demonstrate artistry based on fine technique learned earlier.
Level 1 has 4 Technique Secrets, each with a unique name.
- Round Hand Shape (Hand Cups)
- Relaxed Wrist (Wrist Float-off)
- Light Hand Bounce (Woodpecker Taps)
- Finger Independence (Finger Talk)
Check out sample Technique Secrets here.
Level 1 Technique & Artistry Book
Technique Secrets (pp. 2-3)

12. When should I begin the Level 1 Sightreading Book and how?
The Level 1 Sightreading Book builds confident early elementary readers in two ways: recognition of individual notes and perception of rhythmic and melodic patterns.
The book is organized into sets of 5 exercises, for 5 days of practice. Each set presents variations on a piece from the Level 1 Lesson Book. Play one exercise a day, completing one set per week.
Students may begin the Level 1 Sightreading Book as soon as they learn “Firefly,” the first song in the Level 1 Lesson book. Introducing sightreading from the first notes on the staff allows the formation of an important principle: Notes that do not change their location on the staff are integrated into compositional patterns that do change. Permanence and change come together for musical literacy.
Here are several ways to use the Level 1 Sightreading Book.
- Teachers listen to the sightreading example for just “Day 1” at the lesson. Assign the next pages of the 5-day set to sightread at home. At the following lesson, the teacher might choose one sample “Day” from that set to hear. Then assign the next set.
- If teaching 30-minute lessons, teachers might consider using the Sightreading Book in place of the Performance Book.
- Some teachers enjoy using the Sightreading Book at the lesson to introduce a new note or piece. The student then learns the correlating Lesson Book piece at home as an independent study.
- The Sightreading Book can be used as a final end-of-level project. Before beginning Level 2A, take several weeks to assign multiple Sightreading Book pages, supported with a PlayTime Book. Students can enjoy a change of pace in their practice routine, while celebrating all the notes they have learned.
- Note: For reading support, Piano Adventures Flashcards are also available and span the Primer through Level 2A.
Level 1 Sightreading Book
Table of Contents (pp. 2-3)
Firefly (pp. 6-9)

About Level 1 Students
13. How many songs should a student be assigned each week?
There is no firm answer to this, but one interesting “rule of thumb” is to give students the same number of pieces as their age. A 7-year-old student would then have 7 items on the practice sheet.
These items can include 5-finger scales, a theory page, a Technique & Artistry exercise, as well as new and review pieces. Playing review pieces or “just for fun” pieces is helpful as it allows the student to bring the piece to a higher level of performance. It also lets the teacher assign songs to be memorized (ideal to do for elementary students). Finally, review pieces invite creative ventures, such as making up a new ending to a song.
Many children may be able to do more entries than their age, and this is always encouraged. The teacher might relay, “Your songs this week seemed easy for you. What do you think about taking one or two more pieces this week?” The child’s willingness also tells you how much a student is eager to adventure!

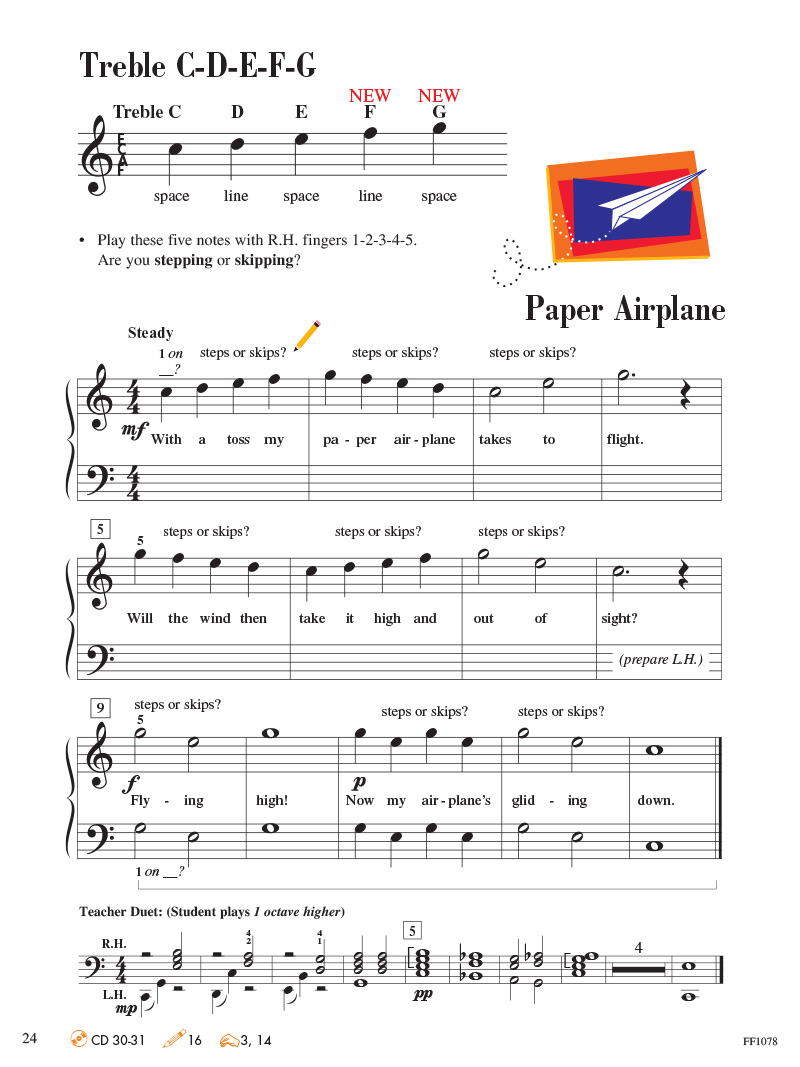
14. How is the damper pedal introduced to the student?
Occasional pedaling is used in Level 1 pieces to give touches of musical color, such as for an introduction or ending. Pedal is also held for the entire piece to create a sustained, impressionistic sound.
Explore the use of pedaling with these sample pages.
Level 1 Lesson Book
Paper Airplane (p. 24)
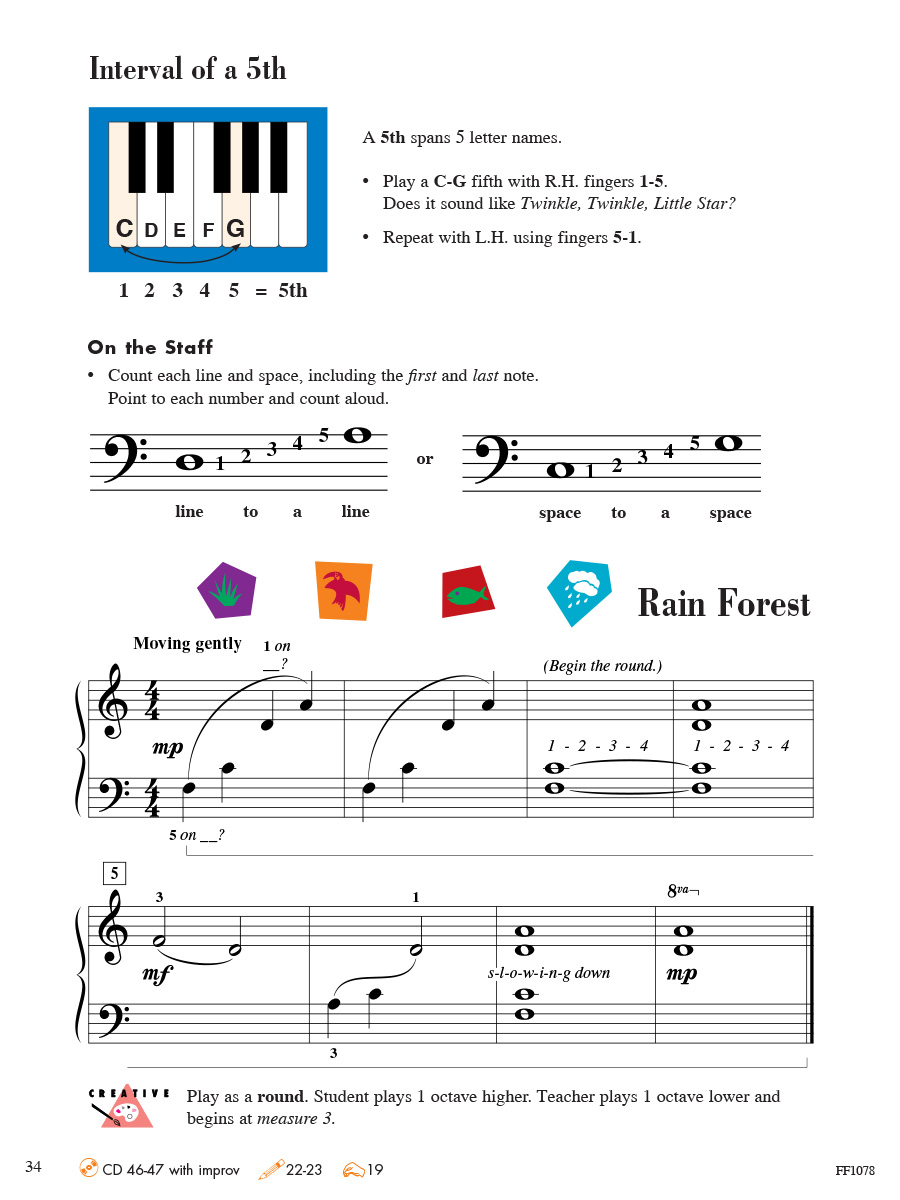
Rain Forest (p. 34)
15. What if a student has a poor sense of rhythm?
If a student has a poor sense of rhythm, here are some fun things to do.
- First, be sure the student can keep a steady beat in a simple setting, then a more complex setting. Set the tempo and have the student clap a steady beat while the teacher plays the student piece. Then have the student clap a steady beat while the teacher plays the Teacher Duet to the same song. Simple rhythm to a more complex rhythm.
- Use rhythm instruments to play the rhythm of the song. Many students especially enjoy playing the xylophone.
- At Level 1, most rhythmic errors involve “sailing through” half notes and whole notes, not giving them their full value. Rather than the teacher writing the counts in, have the student do the writing.
- Playing the Teacher Duets allows students to enjoy an interesting rhythmic background while demonstrating rhythm independence.
16. What pieces could a student play for extra fun?
For extra Level 1 fun, PlayTime Piano Books offer a variety of styles with many familiar songs. A student could start a PlayTime Book at the end of Unit 1 in the Lesson Book.

PlayTime Piano Books provide effective supplementary repertoire in 3 ways:
- They help confirm a clear understanding of basic rhythms with occasional 8th notes.
- They offer great reinforcement of note and intervallic reading.
- They prepare the student for a smooth transition into Level 2A.
See books and song titles for the PlayTime Piano Books.
Level 1 students may also enjoy the Level 1 Gold Star Performance Book (great for recitals), and the Piano Adventures Level 1 Christmas Book. Various Level 1 Sheets are also available.
17. How important are recitals?
Recitals can be an exciting event for the Level 1 student. Recitals can also be intimidating. Students usually form memories of their recitals. So, making it friendly, upbeat, and fun is keenly important.
- Consider calling the recital “The Piano Party.” Great music, great treats, great fun!
- Consider playing one piece with a Teacher Duet. Your composure will transfer to the student. Then the student might play one or more pieces as a “solo.”
- As the recital approaches and students are polishing their pieces, have a “practice performance” with the student by sitting across the room. The student practices walking in, sitting with hands in lap, thinking the tempo in their head, placing hands carefully in position, and beginning the piece. When done, practice taking a bow, smiling, and leaving the piano.
- “Practice performances” can also be done in a small group session with the teacher. If this is done several weeks before the actual event, a good outcome is almost certain. Poise must be practiced!
- Lastly, as “The Piano Party” begins, consider giving the parents a big “thank you” for supporting their child’s music education. And then cheerfully ask the audience to clap enthusiastically for each performer. Shouting “bravo” is fine!
Practice this with the audience. “Your children have worked very hard this year. Let’s practice clapping for the young performers before we begin. Give it your all. Ready, go!” (Begin the clapping with gusto to set the tone.) Kids will get a big kick out of this, and it primes everyone to relax and have a good time. Then the recital can begin.

18. Can I teach Level 1 students in an online lesson? What are some teaching tips?
Yes, it is completely possible to teach Level 1 core books in an online lesson, such as Zoom.
The best way to do this is through subscribing to the Teacher Atlas and using its screen-sharing capability. All books in the Faber Library are available for viewing and screen sharing—including the Level 1 method books and the supplementary PlayTime Piano Books.
Here are some ideas for teaching the Level 1 Lesson Book in an online lesson.
NOTE: Have the student become very familiar with the music before playing. Accomplish this through questions that require active responses from the student. Keep the discussion light, upbeat, and “congratulatory” as the student answers.
Let’s apply this to the first piece, “Firefly.” These are sample ideas. Teachers can create original questions and responses.
Level 1 Lesson Book
Firefly (pp. 8-9)
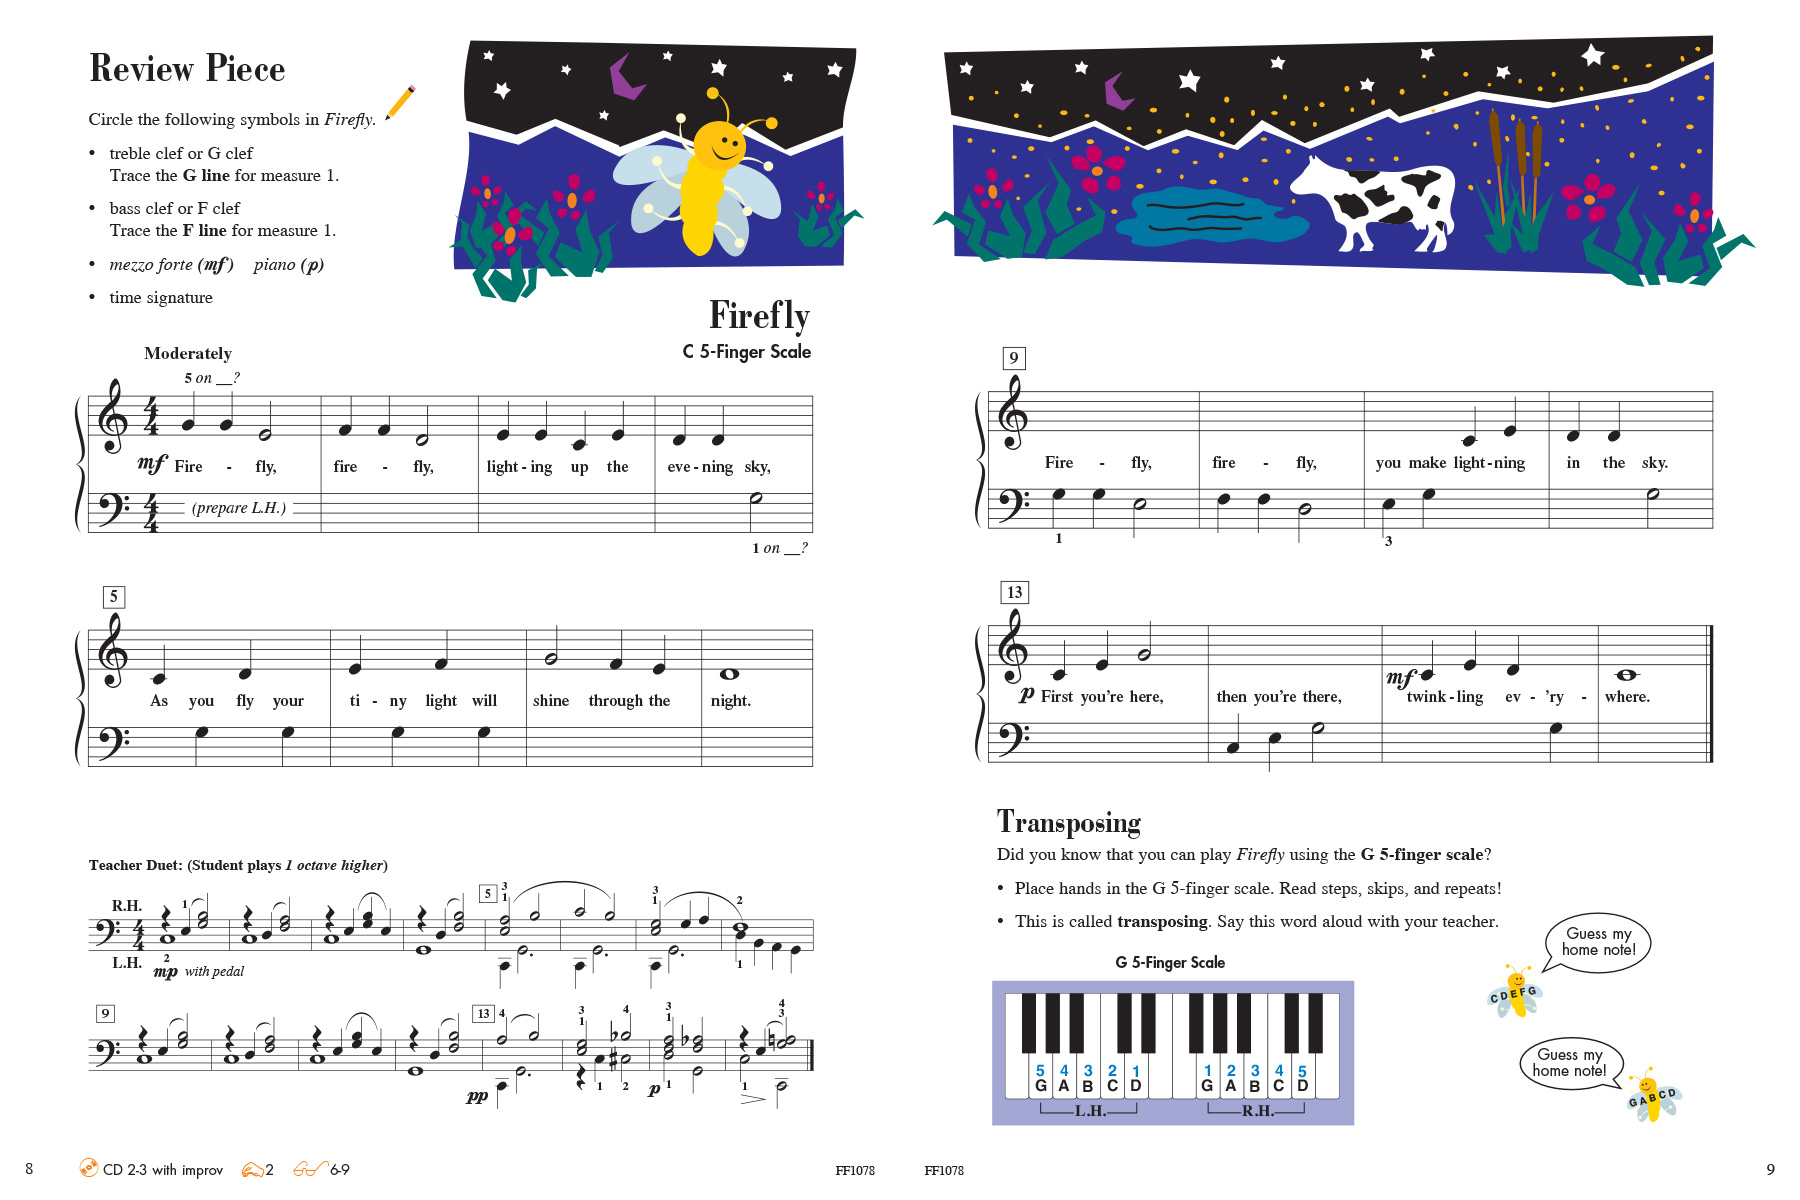
Sample Online Questions for “Firefly”
- At the beginning of the piece is a treble clef. What’s the other name for the treble clef?
“Yes, the G clef!” - Can you play Treble G on the piano for me?
“Excellent!” - What’s the other name for the bass clef?
“That’s right, the F clef.” - Can you play Bass F on the piano for me?
“Good job!” - What is the time signature and what does it mean?
“Good, and we’ll keep at it.” - What is the opening dynamic?
“Good—mezzo forte!” - For the first page, the LH plays only one note. What is it? Can you play it with your LH thumb?
“Exactly.” - Measure 1 has a skip in it. Is it a line-line or space-space skip?
“Correct!” - Does measure 2 have a skip? Is it line-line or space-space?
“Yes, space-space!” - How about measure 3? Can you name the two notes for that skip?
“Yes, C and E.” - Can you name the last note on page 1? What kind of note is it—quarter, half, whole? How many beats does it get?
“Good!” - Which hand begins playing the melody on page 2?
“Yes, the LH.” - Is there a skip in measure 9? Is it line-line or space-space?
“Correct.” - Which measure in that line has a “Smart Note D”?
“Yes, measure 10!” - Is there a piano sign on the page? Which measure?
“Very good!” - I’m going to play the piece. I’ll stop in one of the measures. Tell me in which measure I stopped. (Do several)
- Are you ready to try the piece? Let’s start at this tempo. (Sing a few measures.)
- Assign the piece.

About Level 1 Adventure Learning Videos
19. What are the Adventure Learning Videos?
These videos feature close-ups of the hands with simple text that taps the student’s “musical mind” with theory analysis and technique tips.
The Adventure Learning Videos for Level 1 are currently in progress and will be completed in the middle to end of 2022. They can be very useful in a variety of ways and are modeled after the Primer Adventure Learning Videos.

About Level 1 Audio Files
20. What are the audio files and how could I use them?
Orchestrated accompaniments for Level 1 pieces are available in the Audio Cloud and Piano Adventures Player app. Have fun exploring with your students!
Preview a track a week before teaching it at the lesson. As you listen together, discuss the sound. Is the piece happy or sad? Is the tempo fast or slow? Can you name one of the instruments that is playing?
Playing with a background accompaniment demands correct rhythm, and can be more fun than using a metronome. Students learn to feel the meter and understand the need to “keep going.” Demonstrate with the practice tempo track and point to each note in time, or chant the lyrics, finger numbers, or note names.
Many of the accompaniments encourage free improvisation on the black or white keys. These extra measures offer opportunities to create original sounds.
The musical vignettes in this series introduce the student to a variety of musical sounds and ensembles, such as the marching band, chamber orchestra, jazz ensemble, rock band, and more. Which styles are your favorites?